
Place Illustrator Graphics in to Photoshop
In this Photoshop® tutorial, we will begin building the social media animation. In the previous tutorial, we created the two background graphics in Illustrator® for the animation. If you have not done so, see the link at the end of the tutorial. Now we will place these graphics in to our Photoshop document and add the text.
View Animation
Let's open Photoshop and start a new document that is 1080 by 1080 pixels at 72 dpi.
Index - Photoshop Frame Animation
© 2024 Adobe Systems Incorporated. All rights reserved. Adobe® product screen shot(s) reprinted with permission from Adobe Systems Incorporated. Adobe, Photoshop, Photoshop Album, Photoshop Elements, Illustrator, InDesign, GoLive, Acrobat, Cue, Premiere Pro, Premiere Elements, Bridge, After Effects, InCopy, Dreamweaver, Flash, ActionScript, Fireworks, Contribute, Captivate, Flash Catalyst and Flash Paper is/are either [a] registered trademark[s] or a trademark[s] of Adobe Systems Incorporated in the United States and/or other countries.
View Animation
Let's open Photoshop and start a new document that is 1080 by 1080 pixels at 72 dpi.
- Open Photoshop and click the New File button on the left.
- In the Preset Details section on the right, set the following values and click Create (see screenshot).
- From the top menu, click File - Place Embedded (see screenshot). Choose the background file.
- In the Open As Smart Object window (see screenshot), keep the default settings and click OK.
- Click the checkmark on the Context toolbar, to set the graphic on to the canvas.
- Repeat the previous step for the stars file.
- In the Layers panel, open the menu and click Duplicate Layer. Reduce the Opacity of this second stars layer to zero (see screenshot).
- Select the Horizontal Type tool and add the word Watch to the canvas. Change the layer name to Watch in the Layers panel.
- Click the icon on the Context toolbar to horizontally center the word on the canvas.
- Set the X value to 260 and the Y value to 290 in the Properties panel (see screenshot).
- With the Watch layer selected, duplicate the layer in the Layers panel and name this new layer Learn.
- On the canvas, change the word from Watch to Learn.
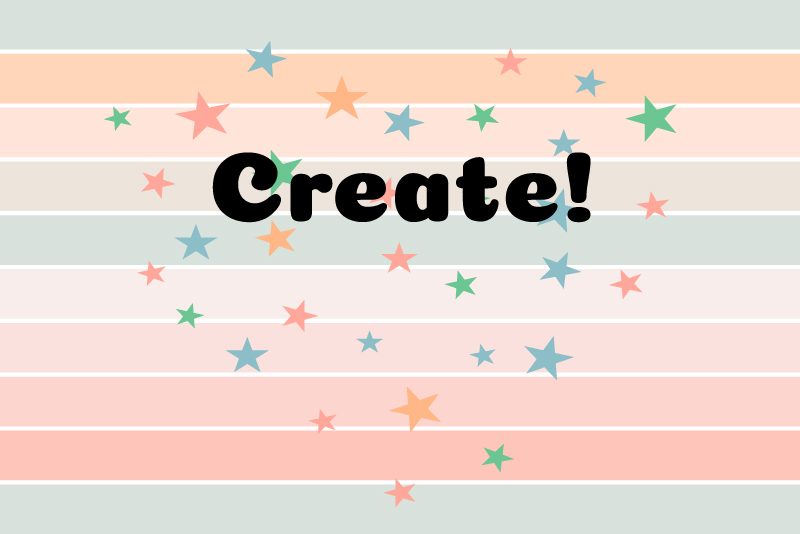
- Repeat the previous step and change the word to Create!. This time, set the Font Size to 175 points and keep the Y value to 290.
- In the Layers panel, reduce the Opacity to zero for the Watch and Learn layers.
- If the Timeline is not visible, click Window - Timeline from the top menu. Click the button at the center of the Timeline panel and choose Create Frame Animation (see screenshot).
- With the frame selected, click the Delay time directly under the frame thumbnail, to open the popup menu. Choose 2.0 seconds from the menu (see screenshot).
- Open the Looping option popup menu under the frame thumbnail and set it to Once (see screenshot).
- Save your work as a new .psd document named CreateAnimation.
Width: 1080 pixels
Height: 1080 pixels
Portrait Orientation
Resolution: 72 pixels/inch
Color Mode: RGB Color, 8 bit
Background Contents: White
You should have a new document with one white layer in the Layers panel. Rename this layer to white bg. We will now place both background graphics on to our canvas.
This will place a copy of the background graphic in to our document as a smart object. You should have a copy of the background placed on the canvas and a new layer named background in the Layers panel. The white background of the canvas will show through the empty areas between the colored panels.
The stars layer should be above the background layer in the Layers panel. We will need two stars layers for our animation, one for the fade in/out animation and one for the layer mask tween.
Now we will add the three words that will be used in our animations.
In the example (see screenshot), the Font Face is Coiny, the Font Size is 150 points and the Color is black.
At this point, we want only the word Create! to be visible on the canvas, along with the background and stars.
Now we will set up the Timeline for our animation.
You should see one frame on the Timeline (see screenshot), which represents the current settings for all the layers in the Layers panel. Therefore, we should have the white bg, background, stars and Create! layers visible. We will set the duration, or Delay time, for this frame to 2 seconds, which will give the viewer time to notice and read the word on the canvas.
At this point, the Looping option is set to Forever, which means the animation will repeat forever. However, it is easier while we are building our animation, if we set the Looping option to once. When we have completed the project and are ready to export, we will change it back to forever.
Index - Photoshop Frame Animation
© 2024 Adobe Systems Incorporated. All rights reserved. Adobe® product screen shot(s) reprinted with permission from Adobe Systems Incorporated. Adobe, Photoshop, Photoshop Album, Photoshop Elements, Illustrator, InDesign, GoLive, Acrobat, Cue, Premiere Pro, Premiere Elements, Bridge, After Effects, InCopy, Dreamweaver, Flash, ActionScript, Fireworks, Contribute, Captivate, Flash Catalyst and Flash Paper is/are either [a] registered trademark[s] or a trademark[s] of Adobe Systems Incorporated in the United States and/or other countries.

Related Articles
Editor's Picks Articles
Top Ten Articles
Previous Features
Site Map
Content copyright © 2023 by Diane Cipollo. All rights reserved.
This content was written by Diane Cipollo. If you wish to use this content in any manner, you need written permission. Contact Diane Cipollo for details.


